The ULTIMATE Angels Landing Guide for First-timers
I am scared of everything… yes, I mean everything. Anddd hiking Angels Landing was no exception.
I will eventually do most things, but not until I look up every possible thing that could go wrong (I looked up the “Angel’s Landing deaths” more times then I’d like to admit), pace back and forth, and say “I’m not doing it” a million times.
Please tell me other people do this as well?!
Welll, 9 times out of 10, the activity at hand is not as bad as it seems.
Except my experience white water rafting… that was as bad as I thought it was going to be…but that’s a story for another time.
This site contains affiliate links to products (only products I have tried and truly love). I may receive a small commission for purchases made through these links at no extra cost to you. Thank you for your support!
Table of Contents
How do I get toAngel’s Landing?
Angels Landing is located in Zion National Park in southwest Utah.
- Las Vegas Airport: 170 miles
- Salt Lake City Airport: 311 miles
You have to use chains for balance when hiking Angels Landing?!?
Okay, on to Angels Landing… My friend and I were planning a camping trip to Zion National Park. She sent me a picture of Angel’s Landing and told me it was the hike she wanted to do.
I looked into it, and replied back “Sorry, you’ll be doing it alone”
I mean, why would I want to hike something that you have to use chains for balance? Give me a harness please.
I continued to research the death toll, and other personal experiences. I read that there sometimes isn’t room for other people to pass and that the trail is extremely busy.
Yep, still passing.
Okay, okaaaayy… after all of this, I eventually said “Okay, I’ll try, but I might wait for you halfway up”

Angels Landing Details
- Distance: 5.4 miles
- Elevation Gain: 1488 ft
- Estimated Time to Complete: 4 hours
- Difficulty: Strenuous
- Location: Zion National Park- Utah
TIP:: Want to keep track of all your epic hikes? Check out this complete (16+ page) HIKING JOURNAL!
When is the best time to hike Angels Landing?
I can only speak on my experience, but we hiked it during the first week of June. It was a great time because it was not too hot out yet.
When we started the hike, I was wearing a long-sleeve shirt and by the end I had on my tank top.
I can imagine it would be much harder (hotter) in the middle of the summer.
Do NOT hike Angels Landing when raining or snowing. It could be extremely dangerous. So, check the weather before you go.
Average temperatures in Zion National Park:
- Summer (June-August): 85/53
- Fall (September-November): 66/39
- Winter (December-February): 49/25
- Spring (March-May): 61/36
Getting there…
Once you have arrived at Zion National Park, you can only get to Angel’s Landing by shuttle…and it fills up quickly! Read more about the Shuttle Schedule HERE.
Park at Stop 1 at the Visitor Center and get off at Stop 6.
I recommend you get on the first shuttle (6 am) to beat most of the crowds.
IMPORTANT: We arrived around 5:20 am and there were only about 10-15 people in front of us. The rest of the bus was full by 6 though.
What to bring on this exhilarating hike
- Water Pack for a hands-free hike
- Hiking Shoes with great traction
- GoPro
- Hiking snacks
- Travel First-aid Kit
- Layers
The Hike
PART 1: Refrigerator Canyon
After the shuttle drops you off, make sure to stop at the bathrooms at the bottom of the trail.
Then you are ready to go!
The first part of the trail is paved and shaded. You will ascend 1,000 feet in the first two miles.

PART 2: Walter’s Wiggles
Honestly, I found this part of the trail to be the most difficult.
It is called “Walter Wiggles” and it consists of 21 switchbacks.
Be prepared to go back and forth (and back and forth) steadily up a hill.
As much as I LOVE to hike, I still always struggle going up-hill. I’m always out of breath and people always pass me. But, hey slow and steady wins the race?!
I just like to take my time and enjoy the surroundings 🙂

PART 3: Scout’s Landing
After you finish the switch backs, you arrive at Scout’s Landing. This was the point I thought I was going to stop at.
There were many people who stopped here, and there is still a great view.
Do NOT keep going if you do not feel comfortable. You can still get great views from this point.
Seriously, it is a dangerous trail, only proceed if you are ready and comfortable.
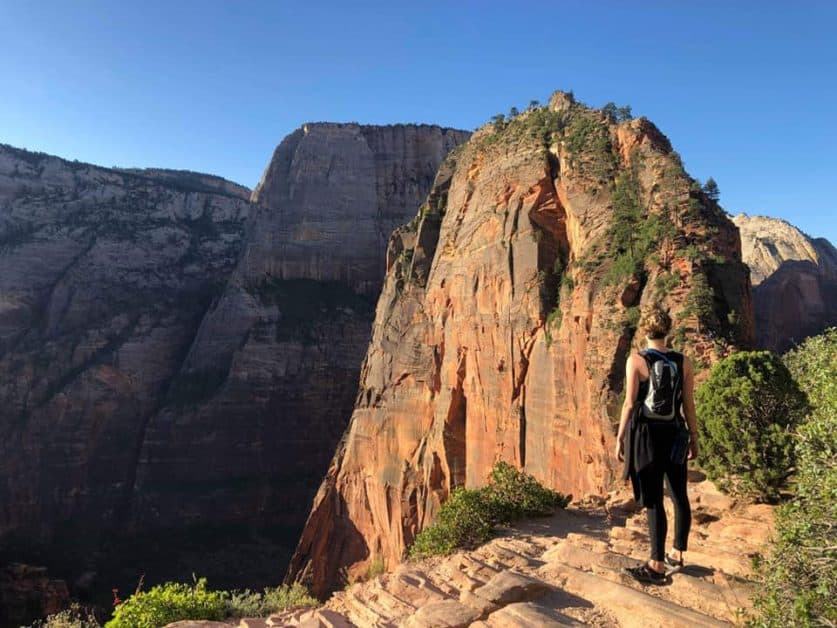
PART 4: Angels Landing Summit/The Spine
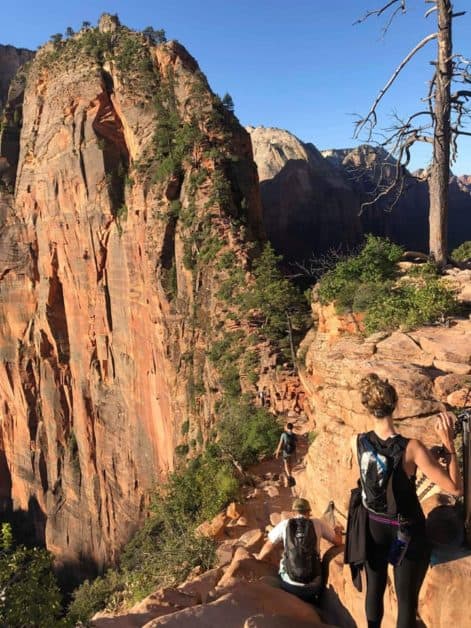
The last half-mile, you are climbing straight up with HUGE drop-offs on both sides of you.
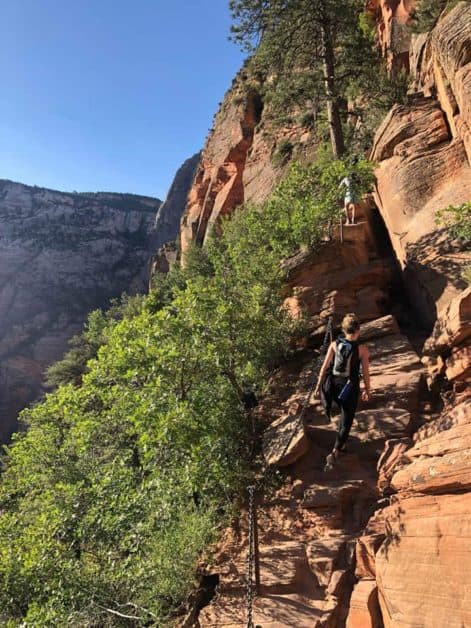
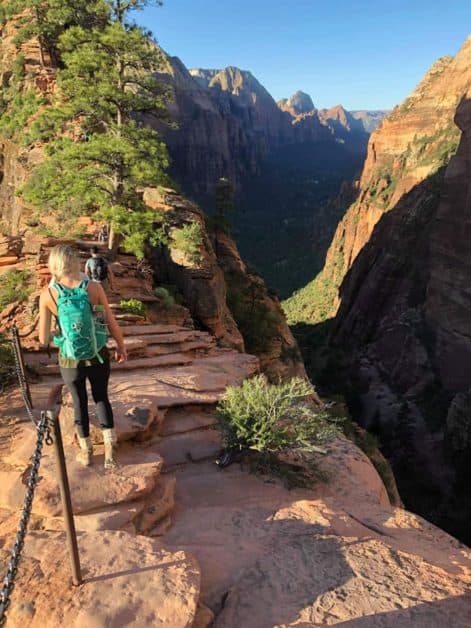
There are chains available at the most exposed parts.
I went slow and watched my step (and put away my camera!!!), but never felt super scared. As long as you are careful, observant, and responsible, you will have no problem!
Then you reach the summit and are rewarded with the most magnificent views all around you!
There is enough room to take pictures, have a snack, and enjoy your accomplishment.
Beware! There are chipmunks EVERYWHERE at the summit that will try to eat any food you have.
The Way Down:
This is where we saw how busy the trail really gets! It was packed. We spent a lot of time allowing others to pass (at safe places) and taking our time navigating the crowds.
Final thought and tips:
- Be prepared (see what to bring above)
- Only proceed if comfortable
- Go slow and let others pass (at a safe place)
- Check the weather before hiking
- Get on the first shuttle
- Enjoy the view from the summit of Angel’s Landing!

Let’s be FRIENDS! Come tell me about your experience hiking Angels Landing or ask any remaining questions. Follow me on Instagram or join our private USA ROAD TRIPS Facebook group!

What other tips would you give first-timers before they hike Angels Landing?
Wow! What lovely views! Thank you for sharing this amazing hike. I can’t wait to read more about your adventures.
Thank you!! 🙂
I would love to hike this as it looks beautiful, though I have really bad asthma, so it probably wouldn’t be the best idea 🙁 Gorgeous photos though, and what a great guide!
Thank you so much!
Good on you for getting out there despite any lingering fears! Well done!
Thank you! 😄
🙂
I just hiked Angel’s Landing last summer! :] We got on the very first shuttle and managed to escape most of the crowds + finish the hike pretty early in the morning! Glad you ended up deciding to go–the views were so pretty!
This sounds like the best way to do it…I would like to see the views, but normally I try to avoid trails like this that are super crowded! It looks really gorgeous though.
Wow such awesome scenery. My favourite thing to do whilst somewhere new is to go hiking and explore by foot! Looks like you had fun and proud of you for getting over your fears haha x
Looks like quite a hike! But the views are so worth it, gorgeous photos!
Wow, what a hair-raising hike! I suffer from vertigo so I’m not sure I’d manage it! The views definitely look worth the effort though! Thanks for the great guide!
Hannah | https://getlost.blog/
Such an informative post. The pictures are stunning. Adding to my bucket list!
It’s so cool that you conquered your fears and braved this hike! Your photos are pretty. I’m adding this hike to my list even though I’m scared. Haha.
Oh my, those views and cliffs! Totally in love, and totally going on my bucket list! x
Angel’s landing is a classic hike! After a few times, I now prefer observation point! Less crowds and less stress. Thanks for the great post!